
No products in the cart.

How Long to Boil Breast Pump Parts: A Step-by-Step Guide
Becoming a parent comes with plenty of new routines, and cleaning your breast pump is one of them. While pumping helps make feeding more flexible and convenient, it’s equally important to make sure every part that comes into contact with breast milk is cleaned properly.
One question many mums ask is how long it takes to boil breast pump parts to keep them safe for every use.
Breast milk contains valuable nutrients that are perfect for your baby—but those same nutrients can also encourage bacteria to grow if milk residue is left inside pump parts.
That’s why simply rinsing the parts isn’t always enough. Sterilizing compatible components helps reduce harmful germs and gives you peace of mind, especially during your baby’s first few months.
The good news is that boiling breast pump parts is simple when you know the correct method.
In this guide, we’ll explain how long to boil breast pump parts, walk you through the process step by step, highlight which parts can and can’t be boiled, and share practical tips to help keep your pumping routine safe and stress-free.
💙 Keep Pumping Simple with O&K MUBY
Comfortable, wearable breast pumps with easy-to-clean milk-contact parts—designed to make pumping simpler.
Explore the O&K MUBY CollectionWhy Is It Important to Sterilize Breast Pump Parts?
Keeping your breast pump parts clean is an important part of protecting your baby’s health. After every pumping session, small amounts of breast milk can remain inside bottles, valves, membranes, and other components.
If these parts aren’t cleaned properly, bacteria, yeast, and mould can grow over time, increasing the risk of contamination.
It’s also important to understand the difference between cleaning and sterilizing. Cleaning removes visible milk residue and dirt using warm, soapy water, while sterilizing helps destroy germs that may still remain after washing. Both steps work together to keep your pump hygienic and safe to use.
Regular sterilization is especially recommended before using a breast pump for the first time and during your baby’s early months, when their immune system is still developing.
By following a proper cleaning and sterilizing routine, you can reduce the risk of harmful bacteria while keeping your breast pump in good condition for everyday use.
How Long to Boil Breast Pump Parts?
If you’ve recently started pumping, it’s completely normal to wonder whether you’re cleaning your breast pump the right way. Simply rinsing the parts after each session isn’t enough because tiny amounts of breast milk can remain in valves, bottles, and breast shields.
Over time, these milk residues can become a place where bacteria and mould grow if the parts aren’t cleaned and sterilized properly.
Boiling is one of the easiest and most affordable ways to sterilize breast pump parts at home. For most breast pumps, compatible parts should be boiled for around 5 minutes once the water reaches a rolling boil.
This amount of time is generally enough to reduce germs without exposing the parts to unnecessary heat.
Before boiling, always wash every milk-contact part with warm water and a mild washing-up liquid. Sterilization should never replace cleaning—it is the step that comes after washing. Once the boiling time is complete, remove the parts carefully using clean tongs and place them on a clean drying rack.
Allow them to air dry completely before putting the pump back together.
Here’s a quick summary of the process:
- ✔ Wash all pump parts before sterilizing.
- ✔ Bring fresh water to a rolling boil.
- ✔ Fully submerge only the boil-safe parts.
- ✔ Boil for 5 minutes unless your manufacturer recommends otherwise.
- ✔ Remove using clean tongs.
- ✔ Leave the parts to air dry completely before storing or using them again.
What Is the Recommended Boiling Time?
For most boil-safe breast pump parts, the recommended boiling time is 5 minutes after the water reaches a rolling boil. This is generally enough to help eliminate harmful germs while protecting heat-resistant plastic and silicone components.
Before sterilizing, make sure all parts have been thoroughly washed to remove any milk residue.
When boiling breast pump parts:
- Start timing once the water is boiling.
- Keep all compatible parts fully submerged.
- Avoid overcrowding the pot so water can circulate evenly.
- Remove the parts with clean tongs and allow them to air dry completely.
Boiling the parts for longer than recommended won’t make them cleaner. Instead, repeated over-boiling may cause some plastic or silicone components to warp or wear out more quickly.
Always check your breast pump’s user manual, as some manufacturers may recommend a different sterilization method or boiling time.
Why Following the Manufacturer’s Instructions Matters
Although 5 minutes is the general recommendation for boiling breast pump parts, there isn’t a single rule that applies to every breast pump on the market. Manufacturers use different materials and designs, so the safest cleaning method can vary from one model to another.
For example, while many bottles, breast shields, valves, and silicone components can usually be boiled, electronic parts such as the motor, battery pack, controller, and charging cable should never be placed in boiling water. Some brands may also recommend steam sterilization instead of boiling for certain accessories.
Before sterilizing your pump, take a moment to read the manufacturer’s cleaning guide. It will tell you:
- Which parts are safe to boil.
- How long they should be sterilized.
- Which parts should only be washed.
- Which electronic components should never be submerged in water.
Taking a few minutes to follow these instructions can help prevent accidental damage, maintain good suction performance, and extend the life of your breast pump. When it comes to your baby’s feeding equipment, following the manufacturer’s guidance is always the safest approach.
I would make this section practical rather than lengthy. Readers searching for this keyword usually want clear, actionable steps. Here’s a human-friendly version.
Step-by-Step Guide to Boiling Breast Pump Parts
Once you’ve finished pumping, it’s important to clean and sterilize the parts correctly before using them again. Following a consistent routine helps keep your pump hygienic and reduces the risk of bacteria contaminating expressed breast milk. Here’s how to boil your breast pump parts safely.
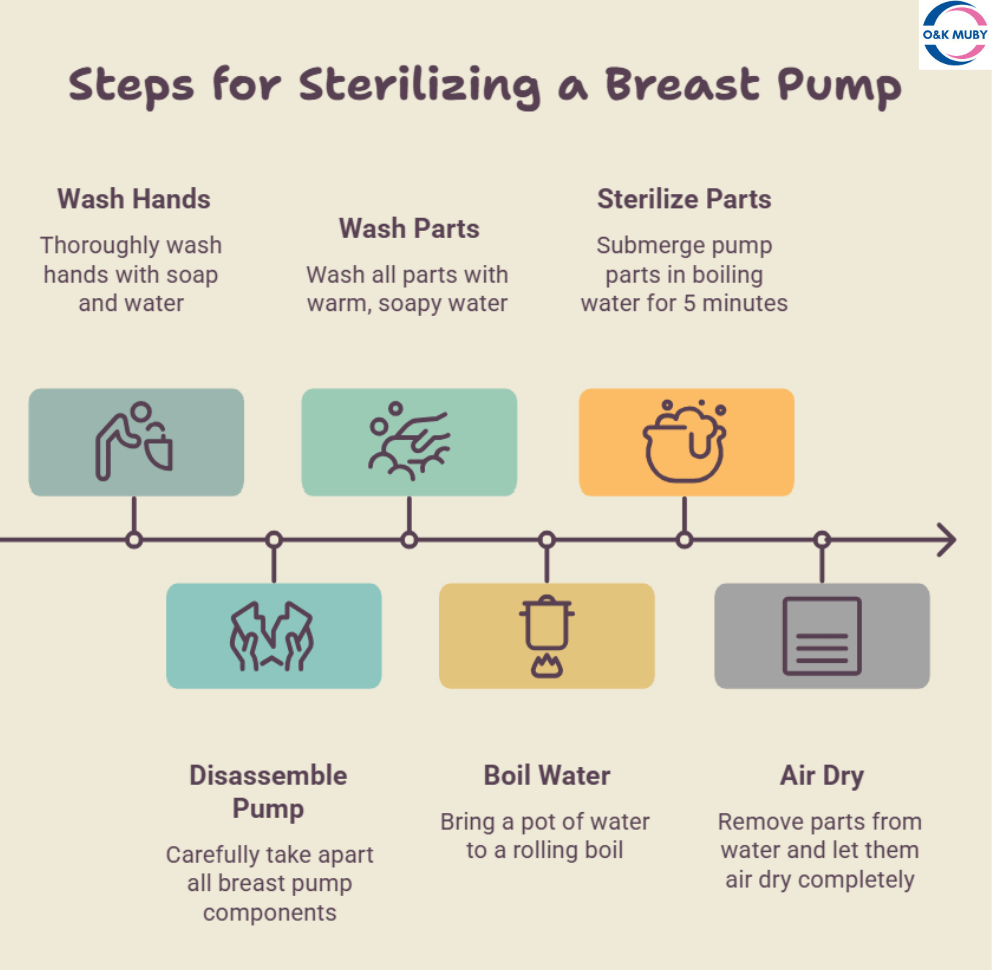
Step 1: Wash Your Hands
Before touching any breast pump parts, wash your hands thoroughly with soap and warm water for at least 20 seconds. Dry them using a clean towel or allow them to air dry. Starting with clean hands helps prevent bacteria from transferring to the pump parts during cleaning.
Step 2: Disassemble the Breast Pump
Take apart all the removable components that come into contact with breast milk. This usually includes the breast shields, collection bottles or cups, valves, membranes, connectors, and any silicone inserts.
Separating the parts allows each piece to be cleaned and sterilized properly. If you’re unsure which parts can be removed, check your breast pump’s user manual before cleaning.
Step 3: Wash the Parts Thoroughly
Before sterilizing, wash every removable part using warm water and a mild washing-up liquid. You can also use a soft bottle or pump cleaning brush to remove any milk residue from hard-to-reach areas.
Pay extra attention to:
- Breast shields (flanges)
- Collection bottles or cups
- Valves and membranes
- Silicone inserts
- Bottle adapters and connectors
Rinse each part thoroughly with clean water to remove any soap before moving on to sterilization.
💙 Keep Pumping Simple with O&K MUBY
Designed with easy-to-clean milk-contact parts, O&K MUBY wearable breast pumps help make your daily pumping routine quicker and more convenient.
👉 Explore the O&K MUBY CollectionStep 4: Boil the Water
Fill a clean saucepan or pot with enough water to completely cover all the parts you’re sterilizing. Place it on the hob and bring the water to a rolling boil before adding the pump parts.
Using enough water helps ensure every surface is fully exposed to the heat throughout the sterilization process.
Step 5: Sterilize the Pump Parts
Carefully place only the boil-safe breast pump parts into the boiling water. Make sure they remain fully submerged and aren’t packed too tightly together.
For most breast pumps, boil the compatible parts for around 5 minutes, unless the manufacturer recommends a different method or timing.
While sterilizing:
- Only boil parts approved by the manufacturer.
- Keep the water boiling throughout the process.
- Avoid leaving the parts in the water longer than recommended.
- Never boil electrical components, motors, or charging accessories.
Step 6: Remove and Air Dry the Parts
Once the sterilization time is complete, use clean tongs to remove the parts from the boiling water. Place them on a clean drying rack or a fresh paper towel, ensuring they have enough space to air dry completely.
Avoid drying the parts with a kitchen towel, as it may transfer bacteria or lint onto the sterilized surfaces. Once everything is completely dry, reassemble the breast pump and store it in a clean, dry place until you’re ready to use it again.
Which Breast Pump Parts Can Be Boiled?
Most milk-contact parts made from heat-resistant plastic or silicone can usually be boiled for sterilization. However, it’s always best to check your breast pump’s user manual, as recommendations may vary by brand and model.
Common boil-safe parts include:
- Breast shields (flanges)
- Collection bottles or cups
- Valves
- Membranes
- Silicone inserts
- Bottle adapters and connectors
Tip: Only boil parts that the manufacturer confirms are safe for high temperatures.
Which Breast Pump Parts Should Not Be Boiled?
Not every breast pump component is designed to withstand boiling water. Electronic and non-heat-resistant parts should never be sterilized this way, as high temperatures can damage them.
Do not boil:
- Pump motor
- Battery pack or controller
- Charging cable
- Power adapter
- Electronic components
- Tubing (unless the manufacturer specifically states it is boil-safe)
Instead, clean these parts according to the manufacturer’s care instructions.
How Often Should You Sterilize Breast Pump Parts?
Breast pump parts should be washed after every use to remove milk residue. Sterilization is recommended before the first use and should continue regularly, especially during your baby’s first few months or if advised by your healthcare provider.
As a general guide:
- Wash all milk-contact parts after every pumping session.
- Sterilize before first use.
- Continue sterilizing regularly for newborns or babies with weakened immune systems.
- Follow the cleaning and sterilization schedule recommended by your breast pump manufacturer.
Yes. This section is much easier to read if each method includes a short paragraph followed by bullet points. Here’s an SEO-friendly version.
Other Ways to Sterilize Breast Pump Parts
Boiling is a reliable way to sterilize breast pump parts, but it isn’t your only option. Depending on your daily routine and the type of breast pump you use, other sterilization methods may be more convenient. Whatever method you choose, always wash the parts thoroughly first and check your manufacturer’s instructions to ensure they’re compatible.
1. Steam Sterilizers
Steam sterilizers use high-temperature steam to sterilize breast pump parts without placing them in boiling water.
They are available as electric units or microwave steam sterilizers and are a convenient choice for parents who pump frequently.
Benefits of steam sterilizers:
- Sterilize multiple items at the same time.
- Suitable for breast pump parts, bottles, and teats.
- Quick and easy to use.
- No need to monitor a pot of boiling water.
Keep in mind:
- Only use for parts that are steam-safe.
- Follow the sterilizer’s instructions for the best results.
2. Microwave Sterilizing Bags
Microwave sterilizing bags are designed for parents who need a fast and portable sterilization solution. Simply add the recommended amount of water, place the cleaned parts inside the bag, and microwave for the specified time.
Why parents choose them:
- Quick sterilization in just a few minutes.
- Lightweight and ideal for travel.
- Reusable for multiple sterilization cycles.
- Easy to store when not in use.
Before using:
- Check that your breast pump parts are microwave-safe.
- Follow both the bag’s instructions and your pump manufacturer’s guidance.
3. UV Sterilizers
UV sterilizers use ultraviolet light to reduce bacteria without using heat, steam, or water. They’re becoming increasingly popular because they leave the parts dry after sterilization.
Advantages of UV sterilizers:
- No boiling water or steam required.
- Parts are dry after the cycle.
- Suitable for daily use.
- Simple and convenient to operate.
Things to remember:
- Not all breast pump parts are compatible with UV sterilization.
- Always check the manufacturer’s recommendations before use.
No matter which sterilization method you choose, washing your breast pump parts thoroughly before sterilizing is essential. Cleaning removes milk residue, while sterilization provides an extra level of protection by helping to reduce harmful germs. This combination helps keep your pumping equipment hygienic and safe for every use.
Common Mistakes to Avoid When Boiling Breast Pump Parts
Even if you’re boiling your breast pump parts regularly, a few common mistakes can reduce the effectiveness of sterilization or damage the equipment. Avoiding these errors will help keep your pump hygienic and extend the life of its components.
Common mistakes include:
- Skipping the washing step before sterilizing.
- Boiling parts for longer than recommended.
- Boiling electronic components or the pump motor.
- Using a pot that isn’t clean.
- Allowing parts to touch the bottom of the pot for long periods.
- Drying sterilized parts with a used kitchen towel.
- Storing pump parts before they’re completely dry.
- Not following the manufacturer’s cleaning instructions.
A simple cleaning routine and proper sterilization technique can go a long way in keeping your breast pump safe and in good working condition.
When Should You Replace Breast Pump Parts?
Breast pump parts naturally wear out with regular use. Replacing worn or damaged components helps maintain good suction, improves pumping efficiency, and supports proper hygiene.
You should consider replacing parts if you notice:
- Cracks or chips in plastic components.
- Torn or stretched valves and membranes.
- Discoloured or damaged silicone parts.
- Reduced suction during pumping.
- Parts that no longer fit together securely.
- Damage caused by repeated boiling or everyday wear.
Always use replacement parts that are compatible with your breast pump model and follow the manufacturer’s recommendations for replacement intervals.
Final Thoughts
Knowing how long to boil breast pump parts is an important part of maintaining a safe pumping routine. For most boil-safe parts, 5 minutes after the water reaches a rolling boil is generally recommended, but it’s always best to follow your breast pump manufacturer’s instructions.
Remember that sterilization starts with proper cleaning. Wash all milk-contact parts after every use, sterilize them using an approved method, and replace worn components when needed. By following these simple steps, you can help keep your breast pump hygienic, maintain its performance, and provide a safe feeding experience for your baby.
Frequently Asked Questions
Can I boil breast pump parts every day?
Yes. You can boil boil-safe breast pump parts every day if the manufacturer recommends it. Always inspect the parts regularly for signs of wear or damage.
Can I boil wearable breast pump parts?
Yes, but only the milk-contact parts such as breast shields, collection cups, valves, and silicone inserts if they are approved for boiling. Never boil the motor, battery, or charging components.
Is washing enough without boiling?
Washing removes milk residue, but sterilizing provides an extra level of protection by reducing harmful germs. For the best hygiene, follow your manufacturer’s cleaning and sterilization recommendations.
What happens if I boil breast pump parts for too long?
Boiling for longer than recommended can warp plastic, damage silicone parts, and reduce your breast pump’s performance. Always follow the recommended boiling time in the user manual.